If you've recently moved, you'll need to update your home address on your iPhone. This can be done in a few quick steps outlined in this blog post.
With clear and concise instructions and accompanying pictures, you'll be able to successfully change your home address on Apple Maps or Google Maps. So, without further ado, let's get started!
Change Home Address On iPhone By Changing the Contacts Card on Apple Maps
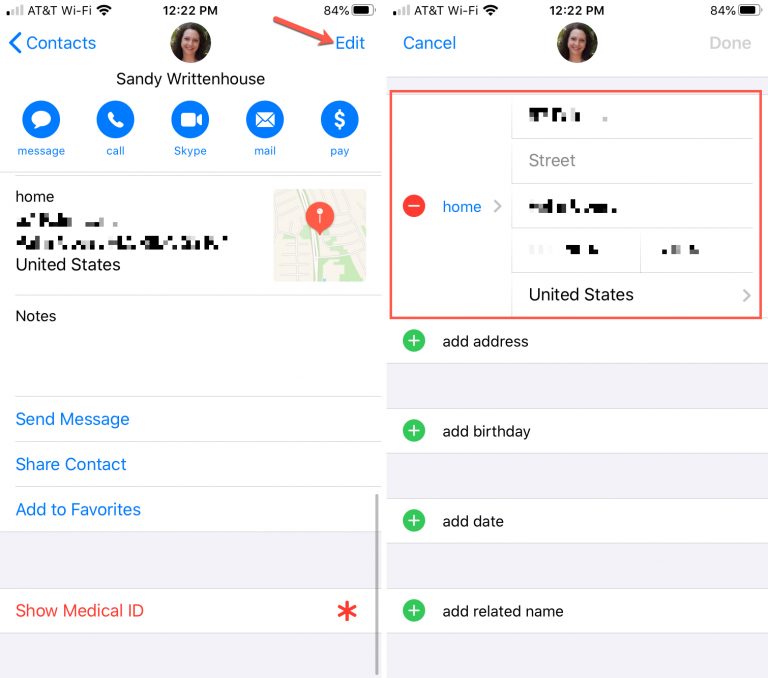
When you save your home address on Apple Maps, Apple generates a contact card. So if you need to change your home address, you can just update the Contact card on Apple Maps in a straightforward process.
Steps
- On your iPhone, launch Apple Maps.
- Select Home from the Favorites menu.
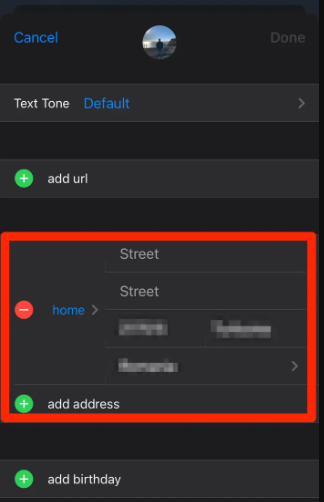
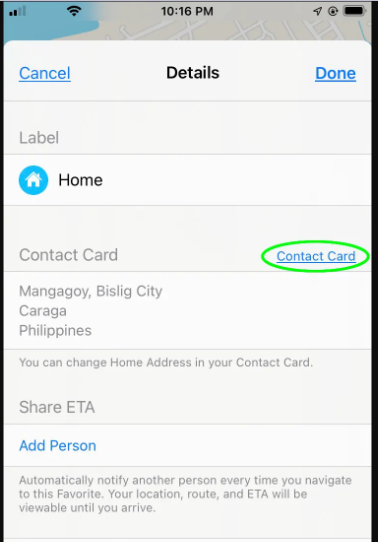
- Click on Open My Contact Card.
- Scroll down until you find your home address information, and then modify it to reflect your actual home address.
- In the top right corner, tap Done.
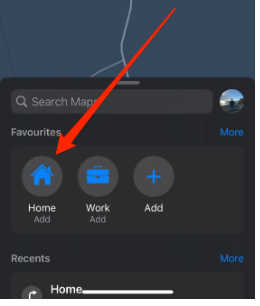
Click Home
Open My Contact Card
Apple Maps will now display your current address. If the position of your home address does not change right away, close the app and reopen it.
Change Home Address on iPhone via Contact Card
How to Change Home Address on iPhone via Mac’s Apple Maps
If you have a Mac, you can change your home address on Apple Maps before syncing it to your iPhone. Make sure both devices (iPhone and Mac) use the same Apple ID. Here's how to do it:
Steps
- In the Maps application on your Mac, click Info (i) next to Home or Work (in the sidebar below Favorites).
- Click My Contact Card to Open. If you do not have a contact card, you can create one or convert an existing card into one.
- Click the Add Address button, then select whether you wish to add your home, work, or school address.
- Enter your address, then click the Done button.
Click Info In the Maps application
Open Mac’s My Contact Card
The home, workplace, or school address has been added to your favourites list.
Steps to Sync Your Contacts and Calendar to Your iPhone
When you sync, your Mac assesses whether your device or your Mac possesses the most up-to-date information and synchronizes any new or modified data.
- Connect your device to your Mac. You can connect your device with a USB or USB-C cable, or you can use Wi-Fi.
- Click the device's icon in the Finder's sidebar on your Mac.
- In the button bar, select the Info option.
- To sync contacts to your device, click "Sync contacts onto [device name]" and then "All groups" or "Selected groups." If you click "Selected groups," mark the groups you want to sync with the checkboxes in the Groups list. To add new contacts to a particular group, check the "Add new contacts from this [device] to" box and choose the group from the pop-up menu.
- Click Apply when you're ready to sync.
Remember to click the Eject button in the Finder sidebar before you take your device off your Mac.
Click the device's icon

Click the device's icon
![Add new contacts from this [device] to](https://www.luckluckgo.com/iphone-location/images/article/en/sync-your-home-address-to-your-iphone-add-new-contacts-from-this-device-to.png)
Add new contacts from this [device] to
How to Add More Than One Home Address on iPhone
If you have more than one home address, whether a permanent residence or a vacation home, you can add both to your iPhone. This is especially beneficial to those who frequently travel for work or pleasure.
Steps
- On your iPhone, open Apple Maps.
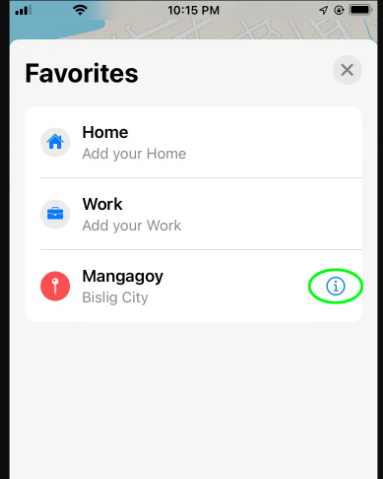
- Tap the "Add" button under Favorites.
- Find the address that you want to add. On the next screen, tap "My home," and you'll be taken to the contact card mentioned earlier.
- Scroll down, and you'll see that the address you just chose has been added to "home." In the top right corner, click "Update."
- On the next screen, which reads "Details," confirm the address and click "Done" in the upper right corner. The home address you just added will show up in the "Favorites" section of the map.

Tap the "Add" button
How to Change the Home Address on iPhone Autofill
Autofill is a convenient feature on your iPhone that fills out forms for you automatically.
However, if you move to a new address, you'll need to update your autofill information, so it's accurate. Here's how to change your home address in iPhone autofill:
Steps
- First, you must use the first method to change your home address on your contact card.
- Once you've changed your home address in Contacts, go to Settings on your iPhone> Safari and then select the "Autofill" option in the General section.
- This is where you may see information on the automatic filling of names, credit cards, passwords, and other information. To begin, ensure that the option to autofill contact information is enabled.
- Select "My Info" to view your personal information, such as name, address, and email. To change it, go to the "Address" section and manually enter your new address.
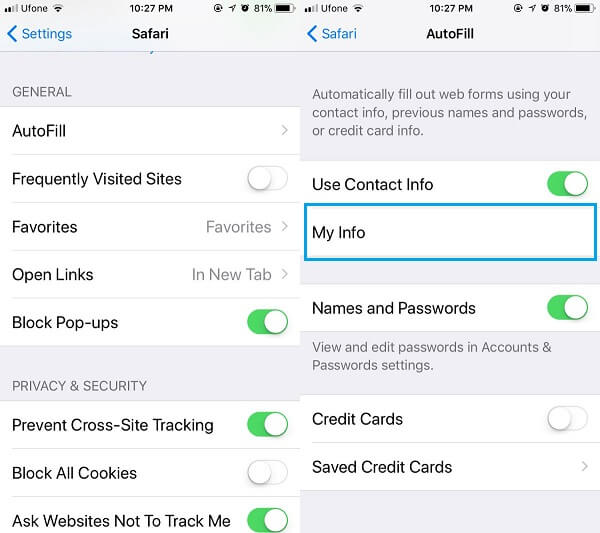
Select "My Info"
In addition to the methods above, you can also change your home address On google maps on your iPhone.
How To Change Home Address On Google Maps on iPhone
You can easily change your home address on Google Maps on your iPhone. It helps you to get the directions to your destination from and to your home without any difficulty.
Steps:
- On your iPhone, launch Google Maps, then tap the "Saved" icon near the bottom of the home screen.
- Below this part, there is a section titled "Your Lists."
- Click the "Labelled" option under this heading.
- In the "Labeled" section, you can see a list of all the places you have labelled, like your office, home, etc.
- Each place will have three dots next to it. Tap the one next to "Home,"
- There are different choices when you click on these three dots. For instance, click on "Edit home."
- You'll see a new screen where you can type in your new address and delete your old one. If not, you can use a map to find your current home address.
- To save your new address, click the "Save" button at the bottom of the screen.
Tap the "Saved" icon
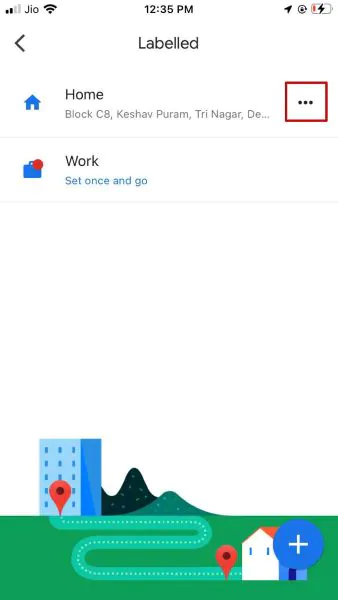
Tap the one next to "Home"
How To Change GPS Address on iPhone
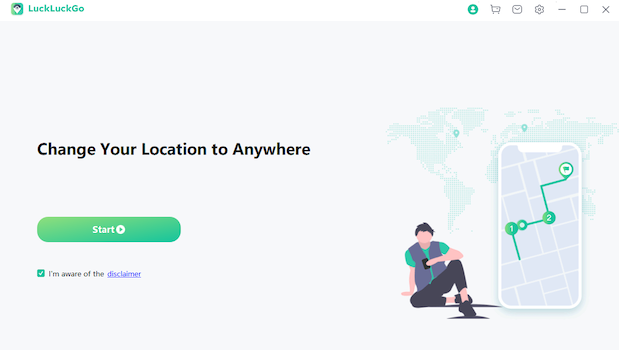
There are a few different reasons you might need to change the GPS address on your iPhone. Maybe you're moving to a new house or office, or perhaps you want to share your location with someone who doesn't know your exact address. Whatever the reason, changing your GPS address is a relatively simple process with LuckLuckGo.
LuckluckGo is a versatile app that can change your location without jailbreaking your device, simulate GPS movement with customized speed, and even change your home address.


LuckLuckGo is also compatible with Location-based games and apps, making it a perfect tool for anyone who wants to take their gaming or app usage to the next level.
When Should You Change Your iPhone's GPS Location?
- Using GPS location spoofing on your iPhone to improve your experience with location-based games like Pokemon Go.
- To talk to people from all over the world by switching your location on social media (Snapchat, Facebook, etc.)
- Maintaining anonymity by masking your iPhone's actual location from apps and websites.
- Keep your true whereabouts a secret.
- Watch movies, listen to music, and shop at stores ordinarily unavailable in your region because of your location.
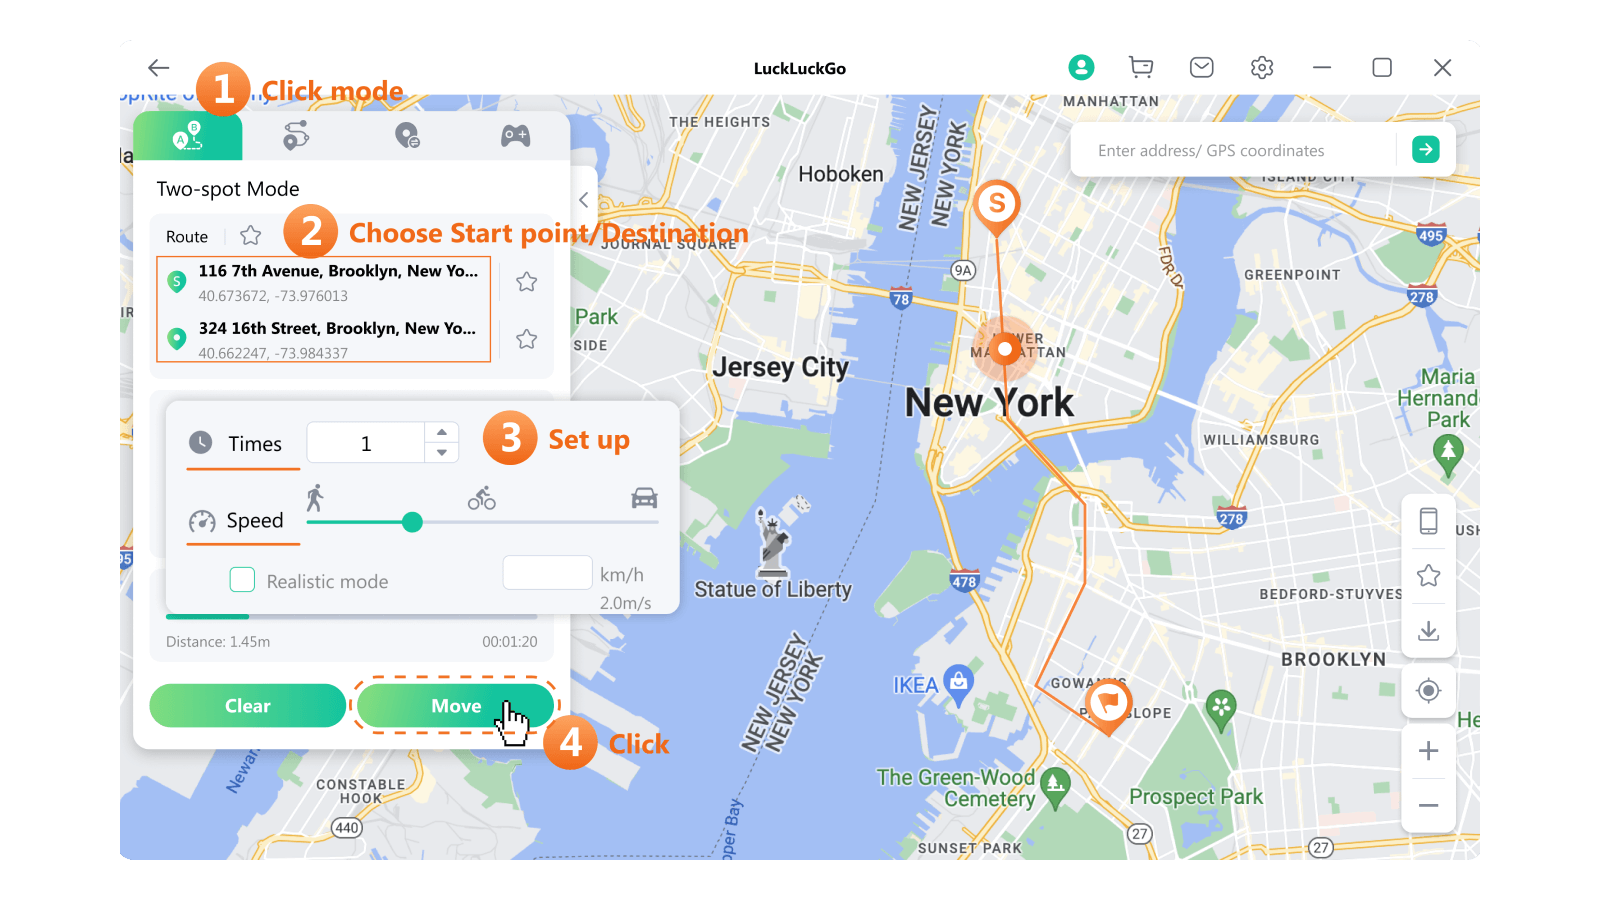
Steps
- Download Download and install the LuckLuckGo app on your device. Then Click "Start."
- Connect your iPhone to the computer, unlock your iPhone and trust this computer.
- In the top left corner, select the desired mode.
- Set a location on the map, adjust the speed and other parameters to your liking, and click "Move."
Click Satrt To Use LuckLuckGo
changes location on iPhone with LuckLuckGo

Why Choose LuckLuckGo?
- High efficiency: It is easy and quick to spoof the location, so you don't have to wait long to switch.
- Once you change the GPS location, it will stay at the new location until you restart your device.
- High suitability: It is compatible with Mac and Windows systems and can change the GPS position for the iPhone/iPad.
- Ease of use: The UI design is friendly for anyone using it.
- Reasonably priced: Competitive pricing and a hassle-free money-back guarantee.
- Safe: No jailbreak is necessary, and your iPhone or iPad will not be harmed.
- Spoof GPS Locations for 5 Phones at the Same Time.
 Former Apple Technican
How To Change The Country Or Region For Your Apple ID
Apple offers different services for different regions and countries. So if you move to another place, then you'd better update your Apple ID information to match the service. Until then, there are a few things you need to keep in mind.
Things You Need To Know Before Changing Country Or Region
- Spend any remaining balance on your Apple ID. Check your Apple Account balance if you're unsure whether you have a balance.
- Cancel your memberships and wait till the subscription period has expired.
- Wait for any pending shop credit refunds and memberships, pre-orders, and movie rentals, to complete. A pre-order can be canceled.
- Ascertain that there’s a payment option in place for your new country or region. Examine the payment options available to you.
- Redownload your music, TV shows, movies, books and apps on any future devices on which you plan to play or read them. Some material may be unavailable in your new country or region.
Steps to Change Your Country or Region on iPhone
- Launch the Settings app.
- Tap your name, followed by Media & Purchases.
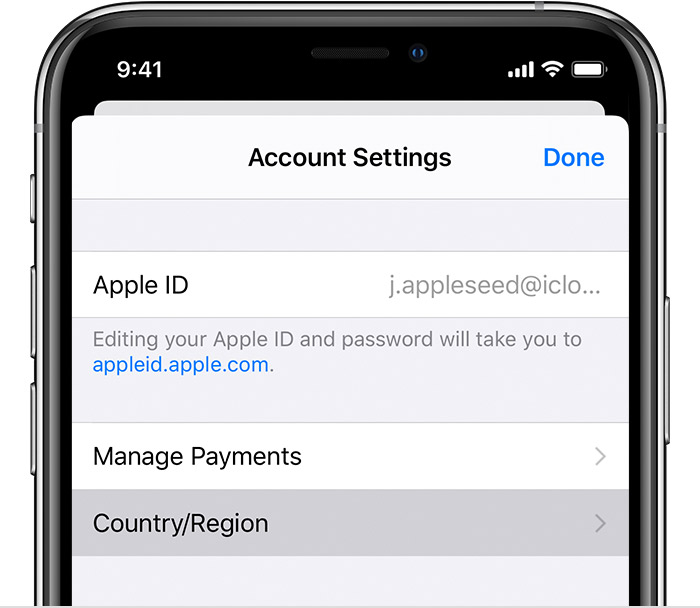
- Select View Account. You may be required to sign in.
- Select Country/Region.
- Select the Change Country or Region.
- Select your new country or region, then read the Terms and Conditions.
- Tap Agree in the upper-right corner, then confirm by tapping Agree again.
- Tap Next after selecting a payment option and entering your new payment information and billing address. You must provide a payment method that is valid in your new country or area.
Select Country/Region
By following the steps outlined in this article, you can easily change your home address on your iPhone and ensure that your iPhone always has the most up-to-date information.
If you are interested in how to fake your GPS address, then the incredibly efficient LuckLuckGo would be a good partner for you. So why wait? Try it today!