
Changing your location on an iPhone is achievable, offering various methods to suit your preferences. Wondering whether to alter your GPS, IP, or Apple ID region? The key is selecting the correct method and following the steps carefully, armed with knowledge to avoid mistakes. This article serves as your guide, providing clear and precise instructions. It's your navigational tool for confidently adjusting your location settings. Let's begin!

Introduction to Changing Your Location on an iPhone
Several methods are available when altering your iPhone's location, each designed for specific requirements. Below is a table to assist in selecting the most suitable option for your needs:
Method | Purpose | Example Use Case |
Using a Location Spoofing Tool | To fake your GPS location for accessing location-based services and games. | Playing Pokémon Go in Tokyo while you're actually in New York. |
Changing Your IP Address with a VPN | To change your IP address for accessing online content restricted in your region. | Watching a TV show available only on the U.S. version of Netflix while you're in Canada. |
Changing Your Apple ID Country or Region | Ideal for moving to a new country or accessing apps, movies, and music exclusive to a specific region. | Accessing a streaming service app exclusive to the U.K., while your Apple ID is currently based in the U.S. |
Controlling the Location Information You Share | To restrict apps from accessing your real-time location for privacy reasons. | Preventing apps like Find My or Life360 from tracking your movements. |
Way 1: Change Your iPhone's GPS Location
What is GPS Location?
GPS location pinpoints the exact geographical position of your iPhone using the Global Positioning System. This technology is integral for location-based services, providing tailored content, navigation aids, and more.
![]()
Why Change GPS Location?
Access Location-Based Services: Participate in apps and games such as Pokémon Go from any location.
Privacy: Conceal your actual location for security or personal reasons.
Content Access: Unlock and enjoy services or content restricted to certain regions
Changing your iPhone's GPS location can be challenging due to Apple's stringent system security. However, it's achievable and opens up new possibilities for accessing apps and services outside your location. Here's how:
Method 1: Changing iOS GPS Location Using LuckLuckGo
LuckLuckGo is a professional tool designed for effortlessly modifying your iPhone's location, allowing you to circumvent geographic restrictions for various applications.
Change Location on iPhone Instantly Change Location on iPhone Instantly
Benefits:
Change your location to anywhere around the globe without restrictions.
User-friendly, requiring no technical knowledge, with comprehensive guides available.
Compatible with all location-based applications, including Find My, Life360, Tinder, and Maps, across all iPhone models and up to iOS 17.
Supports up to 5 devices to change location.
Steps:
Download and install LuckLuckGo on your computer.
Connect your iPhone to the computer using a USB cable.
Launch LuckLuckGo and select the 'Start' option.
Choose the mode you want to use.
Choose a location on the map and click 'Move' to change your iPhone's GPS location.

Method 2: Use GPS Spoofing Hardware
GPS changing hardware directly alters your iPhone's location by connecting a physical device to your smartphone. This approach benefits users requiring a reliable solution without a computer.
Pros: Highly reliable and mobile; no need for a computer to change locations. Less detectable by apps, making it ideal for location-based games.
Cons: It can be expensive, with devices often costing over $200.

Way 2: Change Your IP Address on Your iPhone via VPN
What is an IP Address and How Does a VPN Help?
An IP (Internet Protocol) address is a unique identifier assigned to your device on the Internet. It's like a digital address that tells websites and online services where to send data.
Most regional online restrictions are enforced through IP blocks. However, a VPN (Virtual Private Network) can mask your IP address by replacing it with one from its servers worldwide. This process not only conceals your actual location but also encrypts your data, providing an added layer of security.

Why Change Your IP Address?
By obtaining a new IP, you gain access to content and services globally, offering significant advantages:
Access Content: Stream shows and movies from international Netflix libraries or other geo-restricted streaming services.
Bypass Restrictions: Access websites and services blocked in certain countries or by specific networks.
Enhance Security: Protect your data from hackers, especially on public Wi-Fi networks, by hiding your real IP address.
Shopping and Travel: Obtain better deals on flights, hotels, and online shopping by exploring prices offered to different regions.
Steps to Change Your IP Address on an iPhone
Download a VPN App: Find a reliable VPN app in the App Store and install it on your iPhone. There are both free and subscription-based options available.
Create an Account and Sign In: Follow the app's instructions to sign up and log in. You might need to subscribe or use a free trial.
Grant Permissions: Allow the app to create VPN configurations on your device.
Select a Country: Choose the server location you wish to connect to, based on the content or service you want to access.
Connect: Hit the "Connect" button to establish the VPN connection and change your IP address.
Testing Your VPN: After setting up, verify it's working by visiting the IP2Location website via Safari. The site should display the VPN server's country, not your actual location.

When VPNs Don’t Work:
Remember, VPNs won't help downloading region-locked apps or fooling GPS-based services. Other methods like changing your Apple ID's country or using GPS spoofing tools are necessary in these cases.
Way 3: Change Your Apple ID Country or Region on iPhone
What is Apple ID Country or Region on iPhone’s Function?
The country or region setting for your Apple ID on your iPhone determines the App Store and iTunes Store content you can access. It affects the availability of apps, music, movies, TV shows, and other digital content based on geographic restrictions.
Why Change Your Apple ID Country or Region?
You might need to change your Apple ID country or region for several reasons:
Accessing Region-Specific Apps: Download apps or content unavailable in your current location.
Relocation: Adjust your Apple ID to match your new country or region if you've moved.
Steps to Change Apple ID Country or Region on iPhone:
You have several options to manage changes: directly on your iPhone, through the Music or iTunes app on your computer, and online. Below are the steps for making adjustments now on your iPhone:
Go to the Settings of your iPhone.
Select your name and then 'Media and Purchases.'
Sign in to view your account.

Locate the Country or Region option.
Select your new region or country.
Agree to the 'terms and conditions.'
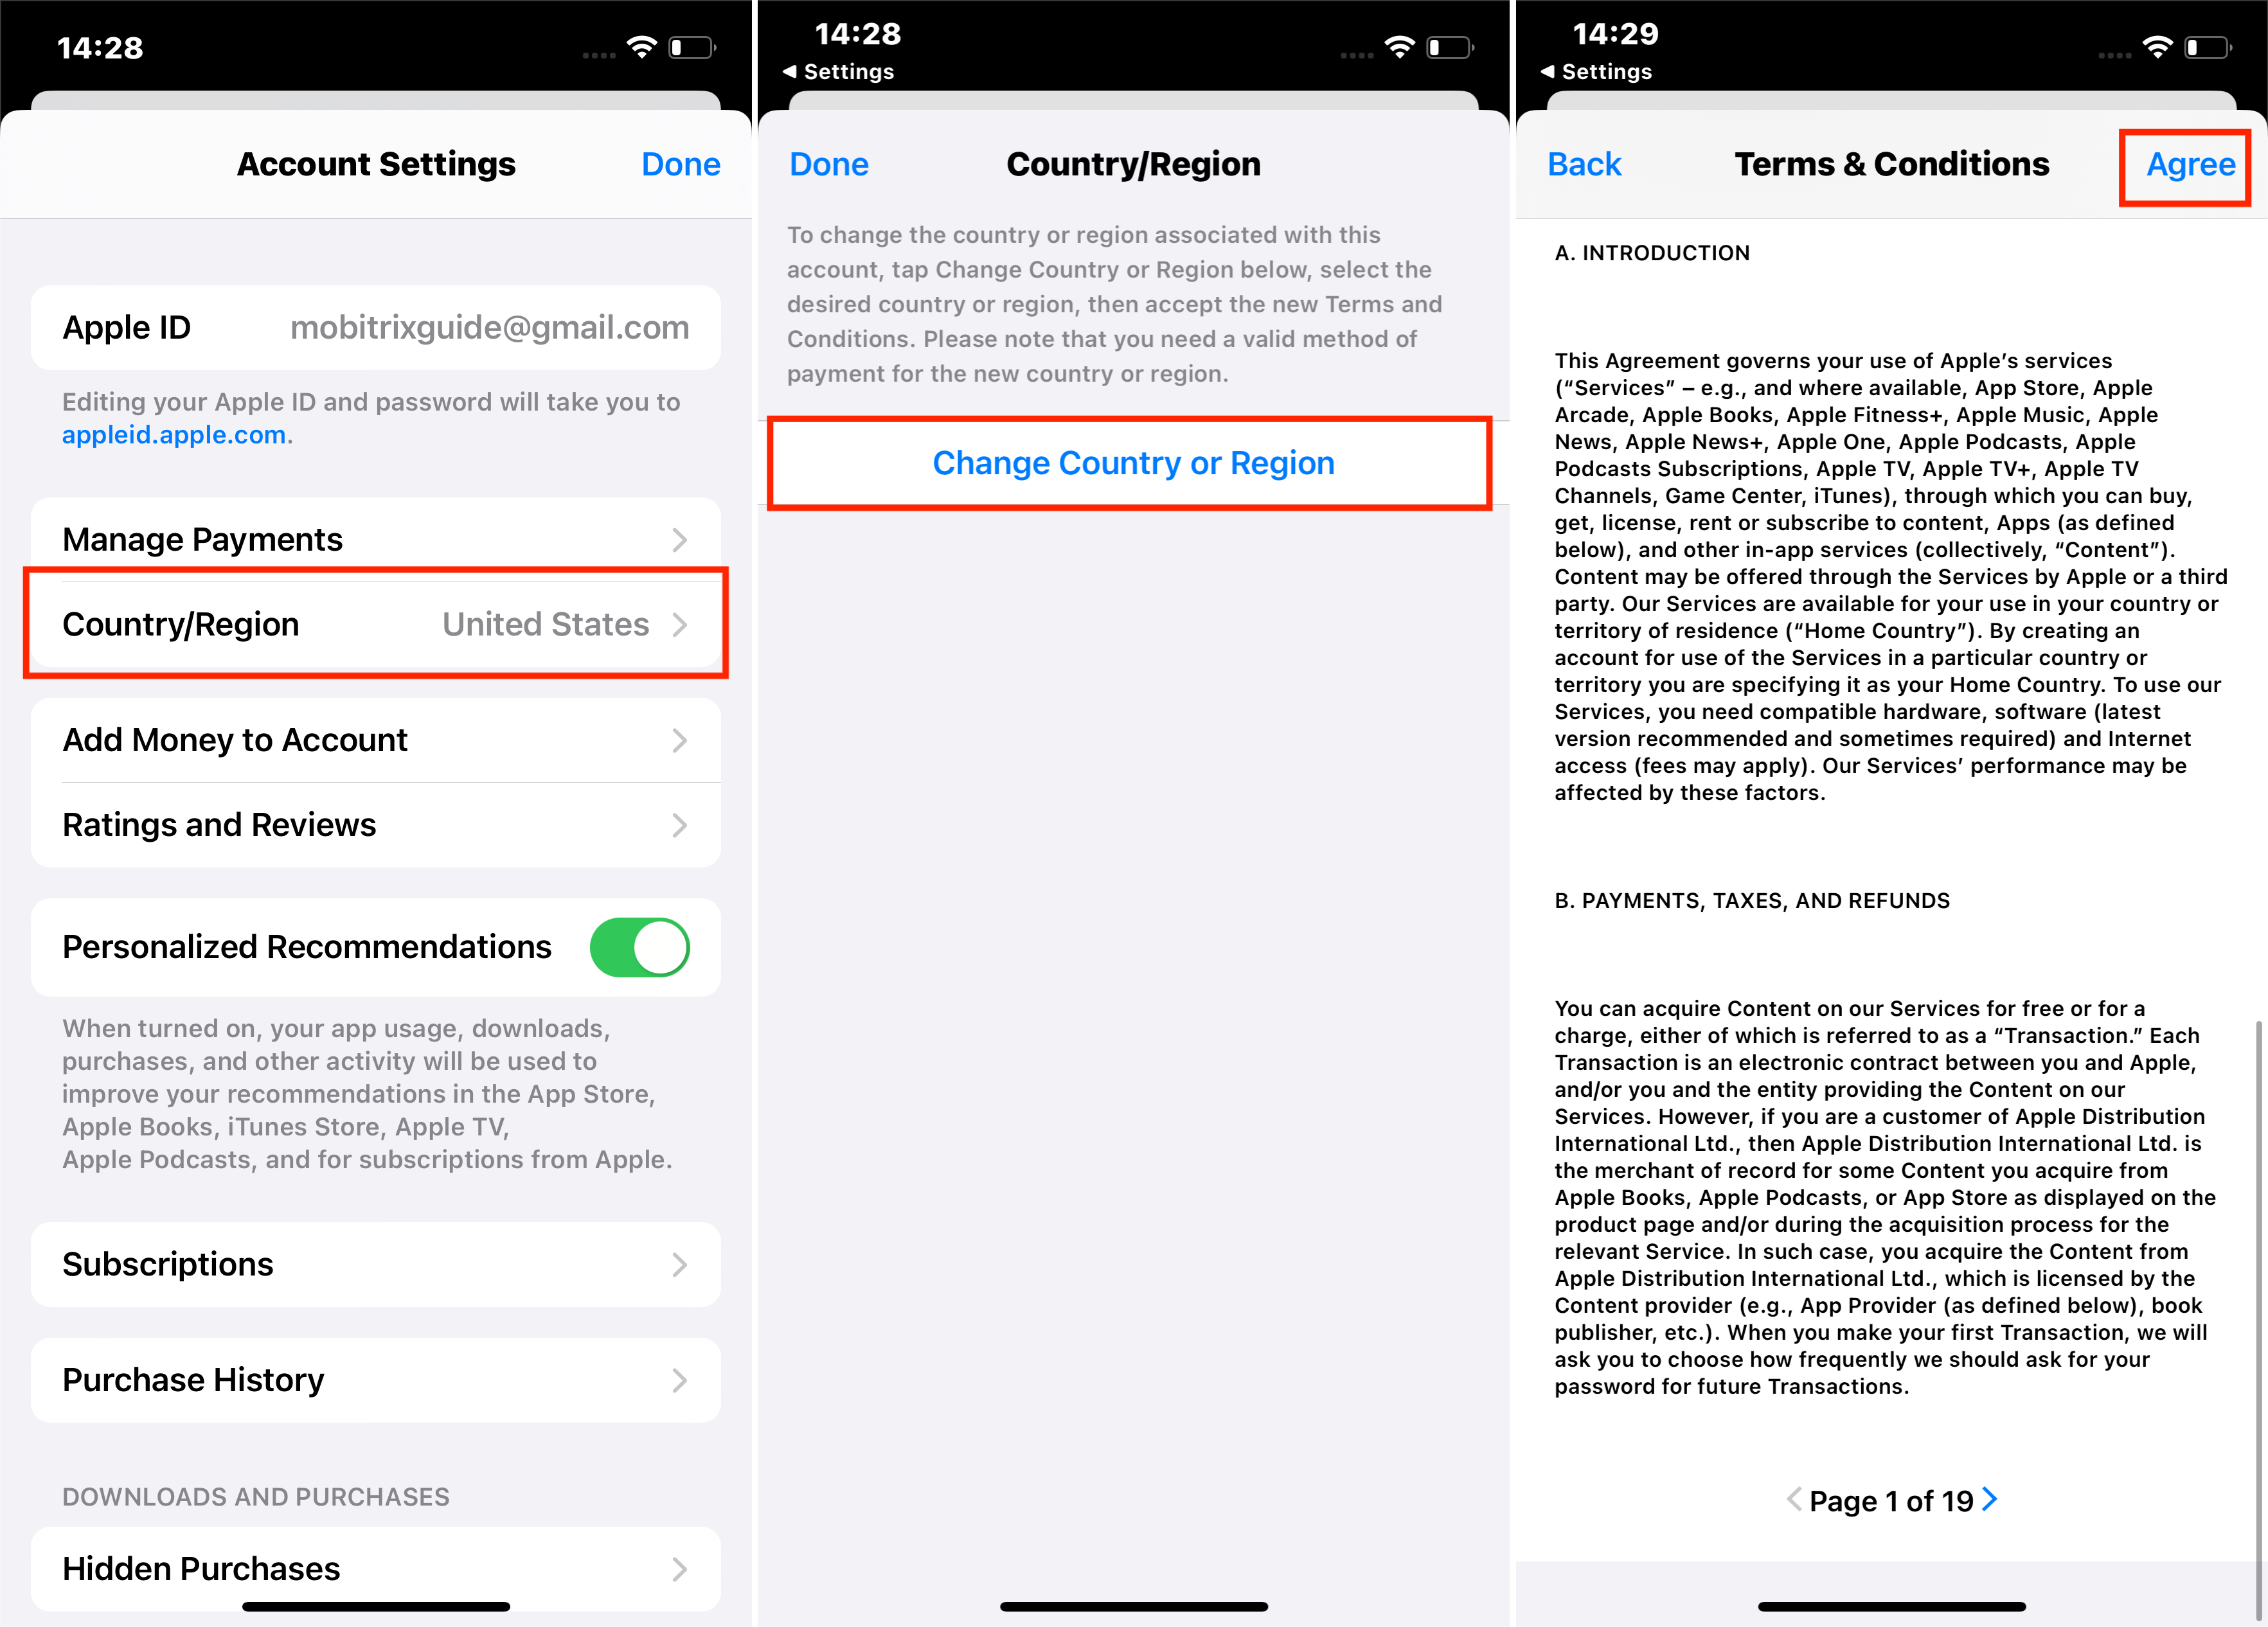
You must enter new payment details according to your new location.
That's it. Your permanent location has changed.
Tips and Keynotes:
This change impacts your store credit, subscriptions, and payment methods. Ensure you have no remaining store credit, cancel any active subscriptions, and prepare a valid payment method for the new region.
If you are part of a Family Sharing group, you might face restrictions in changing your region.
Changing your Apple ID region does not affect your GPS location; apps that use geolocation will still detect your actual location.
Way 4: Turn Location Services Off on iPhone
Introduction to Location Services on iPhone
Location Services on your iPhone utilize cellular, GPS, Bluetooth, and Wi-Fi data to pinpoint your device's location. This functionality allows apps to offer services based on geographical position, enhancing your experience with personalized content and features. However, there may be instances where you prefer to keep your location private.

When You Might Need to Turn Off Location Services
Turning off Location Services can be beneficial for:
Privacy Concerns: To prevent apps from tracking your movements.
Battery Savings: Disabling location tracking can help conserve battery life.
Security: To avoid sharing your location data with specific apps or services.
Disabling Location Services or adjusting access for individual apps can enhance your privacy and security on your iPhone. It controls which apps can track your location, aligning with your preferences and needs.
Steps to Turn Off Location Services on iPhone
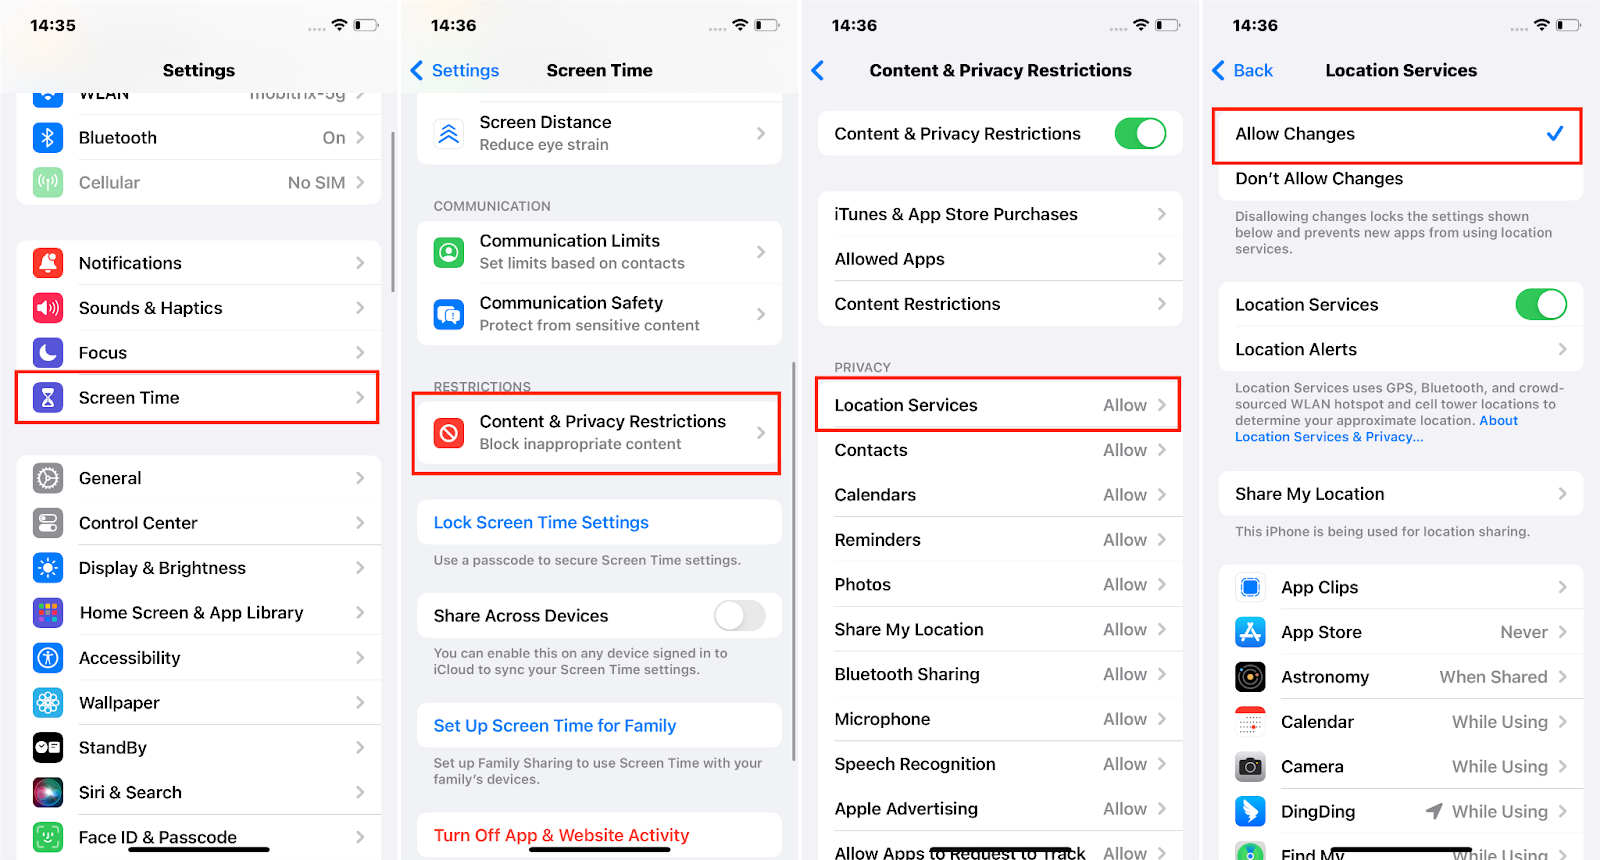
Open Settings on your iPhone.
Tap on Privacy and Security.
Select Location Services.
To turn off all apps, toggle Location Services to off.

To Turn Off Location Services for a Specific App
In Settings, navigate to Privacy and Security > Location Services.
Scroll down and select the app you wish to restrict.
Tap Never to prevent the app from accessing your location.

Tips and Notes
App Functionality: App Functionality: Some apps and features may not work correctly with Location Services disabled.
Greyed-Out Toggle: If the option to turn off Location Services for a specific app is greyed out, it might be due to restrictions. Check this by going to Settings > Screen Time > Content & Privacy Restrictions > Location Services and ensure "Allow Changes" is selected.
Bonus Tip: How to Change iPhone Location on iOS 10 or Older
For those using older iOS versions (iOS 10 or below), editing a PLIST file in your iPhone's backup offers a way to spoof your location. This method requires some technical know-how and access to specific software.
Steps:
Download and install the 3uTools program on a Windows computer.
Connect your iPhone to the computer using a USB cable.
Open 3uTools, navigate to "iDevice" > "Backup/Restore," and select "Backup iDevice."

After the backup, go to "Backup Management," choose the latest backup, and click "View Now."
In the Backup Viewer, navigate to the "AppDomain-com.apple.Maps" folder, then "Library" > "Preferences."
Open the "com.apple.Maps.plist" file and insert the necessary code to spoof your location.

Save the changes, restore the modified backup to your iPhone, and then use the Maps app to simulate your new location.
Recap
In conclusion, changing your location on an iPhone can cater to various needs, from accessing region-specific content to enhancing privacy.
Whether you're spoofing your GPS location, changing your IP address via a VPN, adjusting your Apple ID country, or managing location services, each method offers a tailored solution.
Remember to consider the implications of these changes to ensure a seamless experience. By following the outlined steps, you can easily navigate location settings and tailor your iPhone experience to your needs.
